

Tutorial: Retail Customer Onboarding with Socure and Mbanq Cloud
This guide explains how an API consumer onboards an individual customer by using Socure for identity verification and Mbanq Cloud for the customer record, KYC documents, verification, and activation.
This guide describes the API-consumer-managed Socure flow. In this model, your application calls Socure and Mbanq Cloud separately.
Mandatory ordering
The Client Application must create the retail customer in Mbanq Cloud and establish the corresponding customer context in Socure before it initializes a Socure document-capture session.
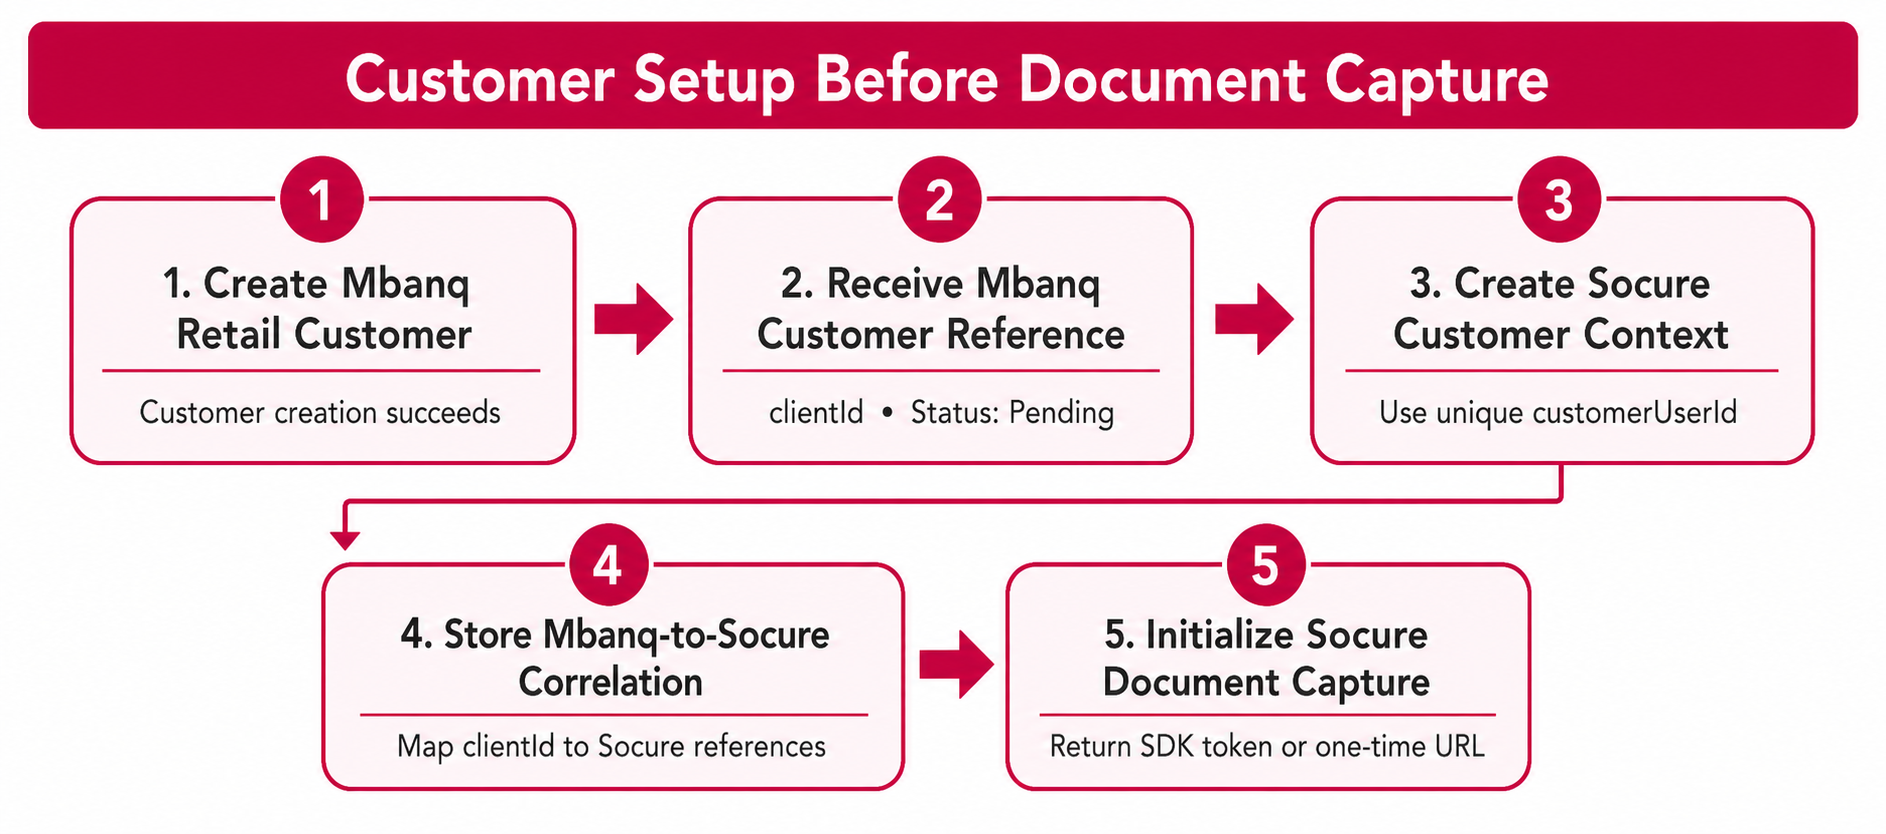
Responsibilities
| System | Responsibility |
|---|---|
| Client Application | Creates the pending Mbanq retail customer, establishes the Socure customer context, initializes capture, maintains correlations, handles retries, calls the remaining Mbanq APIs |
| Socure | Captures the identity document and selfie, performs identity and fraud checks, and returns a decision |
| Mbanq Cloud | Stores the customer profile and required identifiers/documents, verifies that onboarding requirements are satisfied, and activates the customer |
Customer onboarding flow
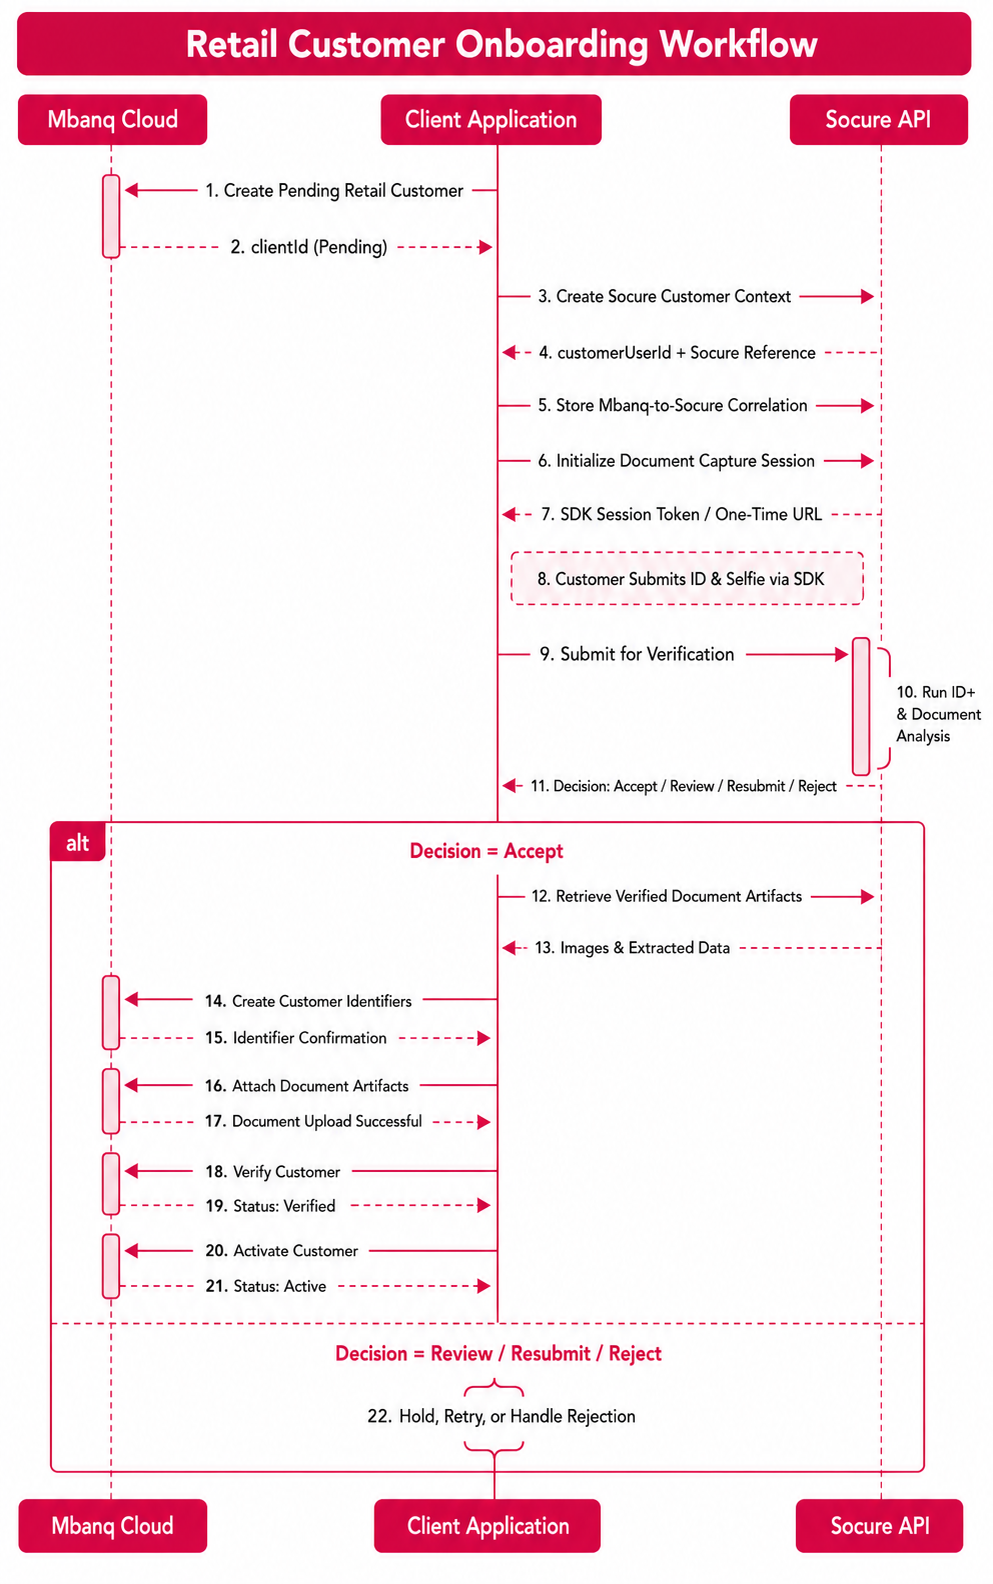
Socure approval and Mbanq customer activation are different events. A successful Socure decision allows your application to continue; it does not by itself verify or activate the Mbanq customer.
In this guide, Client Application means the trusted application backend when calling Mbanq or Socure APIs. Socure production credentials must not be placed in browser or mobile code. Return only a short-lived SDK session token or a one-time capture URL to the UI.
Prerequisites
Before starting, obtain:
- Mbanq Cloud API credentials and tenant ID.
- Socure credentials for the intended environment.
- The Mbanq customer-identifier types enabled for your tenant.
- Your tenant's required KYC verification level, such as
FULL. - A strategy for generating a unique Socure
customerUserIdfor each onboarding attempt. - Secure storage for mapping the Mbanq
clientIdto the SocurecustomerUserId, transaction, session, and document references.
Use sandbox credentials and fictitious personal information during testing. Never submit real SSNs, identity documents, or selfies to a sandbox or simulator.
Step 1: Create the retail customer in Mbanq Cloud
Create a pending person customer before starting the external KYC process.
POST /v1/clients
Authorization: Bearer <MBANQ_ACCESS_TOKEN>
tenantId: <TENANT_ID>
Content-Type: application/json
Use the person legal form (legalFormId = 1) and provide all fields required by your tenant, including:
- First and last name
- Date of birth
- Email address
- Mobile number and country code
- Primary residential address
- Nationality and tax information, when required
The successful Mbanq response must be received before continuing. Store the returned clientId and initial Pending status. Use that clientId as the Mbanq resource reference throughout the remaining flow.
API reference: Create Person Customer
Step 2: Create the customer context in Socure
Start this step only after Step 1 has returned a valid Mbanq clientId.
Generate a unique, opaque customerUserId for the Socure onboarding attempt. Send this value with the first Socure ID+ or Document Request so Socure can associate subsequent transactions and document events with the same retail customer context.
Do not use an SSN, email address, phone number, or other personal information as customerUserId. The value should be non-PII and unique enough to prevent two customers from sharing one Socure context.
Persist the correlation before returning any document-capture token or URL:
{
  "clientId": 12345,
  "socureCustomerUserId": "kyc-attempt-01",
  "socureTransactionReference": "<SOCURE_REFERENCE>",
  "status": "SOCURE_CUSTOMER_CREATED"
}
The current integration does not demonstrate a separate Socure Customer API endpoint. Treat this logical creation step as complete after the first provider request containing customerUserId succeeds and the returned Socure reference has been stored.
Socure API references:
Step 3: Initialize Socure document capture
Use Socure Predictive Document Verification to create a document-capture request from the trusted Client Application backend. Reuse the customerUserId created in Step 2 and store the returned session/document reference against the same Mbanq clientId.
Depending on your integration, the customer can complete capture through:
- A one-time link delivered by SMS
- Socure's Web SDK
- Socure's iOS SDK
- Socure's Android SDK
The capture experience collects the required identity-document images and a selfie/liveness result. Store the Socure customer, session, document, and transaction references against the already-created Mbanq clientId.
Do not treat creation of the document request as successful verification. Wait until Socure reports that document capture and processing have completed.
References:
Step 4: Perform Socure ID+ checks
Submit the customer's required identity data and configured modules to Socure ID+.
The modules enabled for your Socure account can include:
- Address Risk
- Fraud risk modules
- Alert List
- Decision
- Email Risk
- Global Watchlist
- Socure Verify (KYC)
- Phone Risk
- Predictive Document Verification
- Device Risk
Device Risk requires a separate device-intelligence SDK integration and a device/session reference. Do not enable the module unless your application captures the required device data.
Device SDK references:
Step 5: Handle the Socure decision
Use the final Socure decision—not only an individual module score—to decide the next action.
| Socure decision | Consumer action |
|---|---|
accept | Continue to upload the verified identifiers and documents to Mbanq Cloud |
review or refer | Stop automated onboarding and send the case to manual review |
resubmit | Ask the customer to correct information or repeat document capture |
reject | Stop onboarding and present the approved rejection experience |
| Technical failure | Retry safely or route to support; do not interpret an error as a rejection |
Persist the decision, transaction reference, and relevant reason codes for audit and support. Do not store unnecessary raw Socure responses containing personal information.
Step 6: Retrieve the approved document artifacts
After document verification finishes successfully, retrieve the permitted identity-document images or files from Socure.
Keep the artifacts encrypted and only as long as necessary to upload them to Mbanq Cloud and meet your retention obligations. Do not expose Socure credentials or raw document URLs to the client application.
Step 7: Create customer identifiers in Mbanq Cloud
Create a separate Mbanq customer identifier for each required identifier, for example:
- SSN or ITIN
- Passport
- Driver's license
- National identity card
POST /v1/clients/{clientId}/identifiers
Authorization: Bearer <MBANQ_ACCESS_TOKEN>
tenantId: <TENANT_ID>
Content-Type: application/json
Use the identifier type configured for your tenant and store the returned identifier ID.
If your tenant requires jurisdiction-qualified national identifiers, use the configured format, such as US-<SSN> or AE-<NATIONAL_ID>. Confirm this policy with Mbanq before implementation because identifier formats and duplicate checks are tenant-specific.
API reference: Create Client Identifier
Step 8: Attach documents to their identifiers
Attach each retrieved document to the matching Mbanq identifier.
POST /v1/client_identifiers/{clientIdentifierId}/documents
Authorization: Bearer <MBANQ_ACCESS_TOKEN>
tenantId: <TENANT_ID>
Content-Type: multipart/form-data
Examples:
- Attach passport images to the Passport identifier.
- Attach driver's-license images to the Driver's License identifier.
- Attach the configured SSN evidence to the SSN identifier when required.
API reference: Upload Client Documents
Step 9: Verify the customer in Mbanq Cloud
After all required profile data, identifiers, and documents are present, request Mbanq verification.
POST /v1/clients/{clientId}?command=verify
Authorization: Bearer <MBANQ_ACCESS_TOKEN>
tenantId: <TENANT_ID>
Content-Type: application/json{
"kycVerificationType": "FULL",
"note": "External KYC completed and required documents uploaded"
}This operation validates the Mbanq onboarding requirements. It is not another Socure ID+ request.
If the API returns a domain-rule error, inspect the returned developer or globalization code, correct the missing profile data, identifier, or document, and retry.
API reference: Verify Customer
Step 10: Activate the customer
Call activation only after Mbanq verification succeeds.
POST /v1/clients/{clientId}?command=activate
Authorization: Bearer <MBANQ_ACCESS_TOKEN>
tenantId: <TENANT_ID>
Content-Type: application/json{
"locale": "en",
"dateFormat": "yyyy-MM-dd",
"activationDate": "<YYYY-MM-DD>"
}A successful response transitions the customer to Active and completes this onboarding flow.
API reference: Activate Customer
Consumer state model
Track the orchestration with explicit states rather than a single Boolean flag:
MBANQ_CUSTOMER_CREATED
SOCURE_CUSTOMER_CREATED
DOCUMENT_CAPTURE_PENDING
DOCUMENT_PROCESSING
KYC_ACCEPTED
KYC_MANUAL_REVIEW
KYC_RESUBMISSION_REQUIRED
KYC_REJECTED
DOCUMENTS_UPLOADED
MBANQ_VERIFIED
MBANQ_ACTIVE
FAILED
Only MBANQ_ACTIVE means that the customer has completed the full platform onboarding flow.
Retry and security requirements
- Use an idempotency/correlation key for every onboarding attempt.
- Require a valid Mbanq
clientIdbefore creating any Socure session. - Create the Socure customer context and persist the Mbanq-to-Socure correlation before returning a capture token or URL to the UI.
- Do not create a second Mbanq customer when retrying Socure.
- Do not create duplicate identifiers when retrying document upload.
- Verify Socure webhook signatures before accepting status changes.
- Treat webhook delivery as repeatable and potentially out of order.
- Keep Socure and Mbanq credentials on the server; never place them in a mobile or browser application.
- Redact SSNs, document images, access tokens, and full provider responses from logs.
- Present manual-review and rejection messaging approved by your compliance team.
Completion checklist
The customer is fully onboarded only when all of the following are true:
- The pending Mbanq retail customer exists.
- The Socure customer context was established using a unique
customerUserId. - The Mbanq
clientIdand Socure references were correlated before document capture. - Socure returned an acceptable final decision.
- Required identifiers exist in Mbanq Cloud.
- Required files are attached to the correct identifiers.
- Mbanq customer verification succeeded.
- Mbanq customer activation succeeded.
Updated about 1 month ago