Tutorial: Access Token - Self Service User
In the context of integrating MBanq APIs into your fintech application, it's important to understand the concept of Self Service APIs and how they can empower your users. Self service users are authorized individuals within a NeoBank who can perform specific tasks via API without having to log in to the NeoBank's user portal. These APIs have a restricted data scope, making them suitable for creating web and mobile client applications where you don't want to expose the full API to the customer.
API References for Enpoints in this tutorial:
Tutorial: Self Service User Creating Virtual Debit Cards
Let's consider an example scenario involving a commercial business customer that maintains a deposit account with the NeoBank. This customer wishes to create virtual debit cards for their employees, directly from their ERP or Accounts Payable software, without needing to access the NeoBank's user portal. In this case, the NeoBank can create a "Self Service User" profile for this business customer, granting them access to the relevant payments APIs specifically for ACH vendor payments. If you don't already have a Self Service User, you will need to create one.
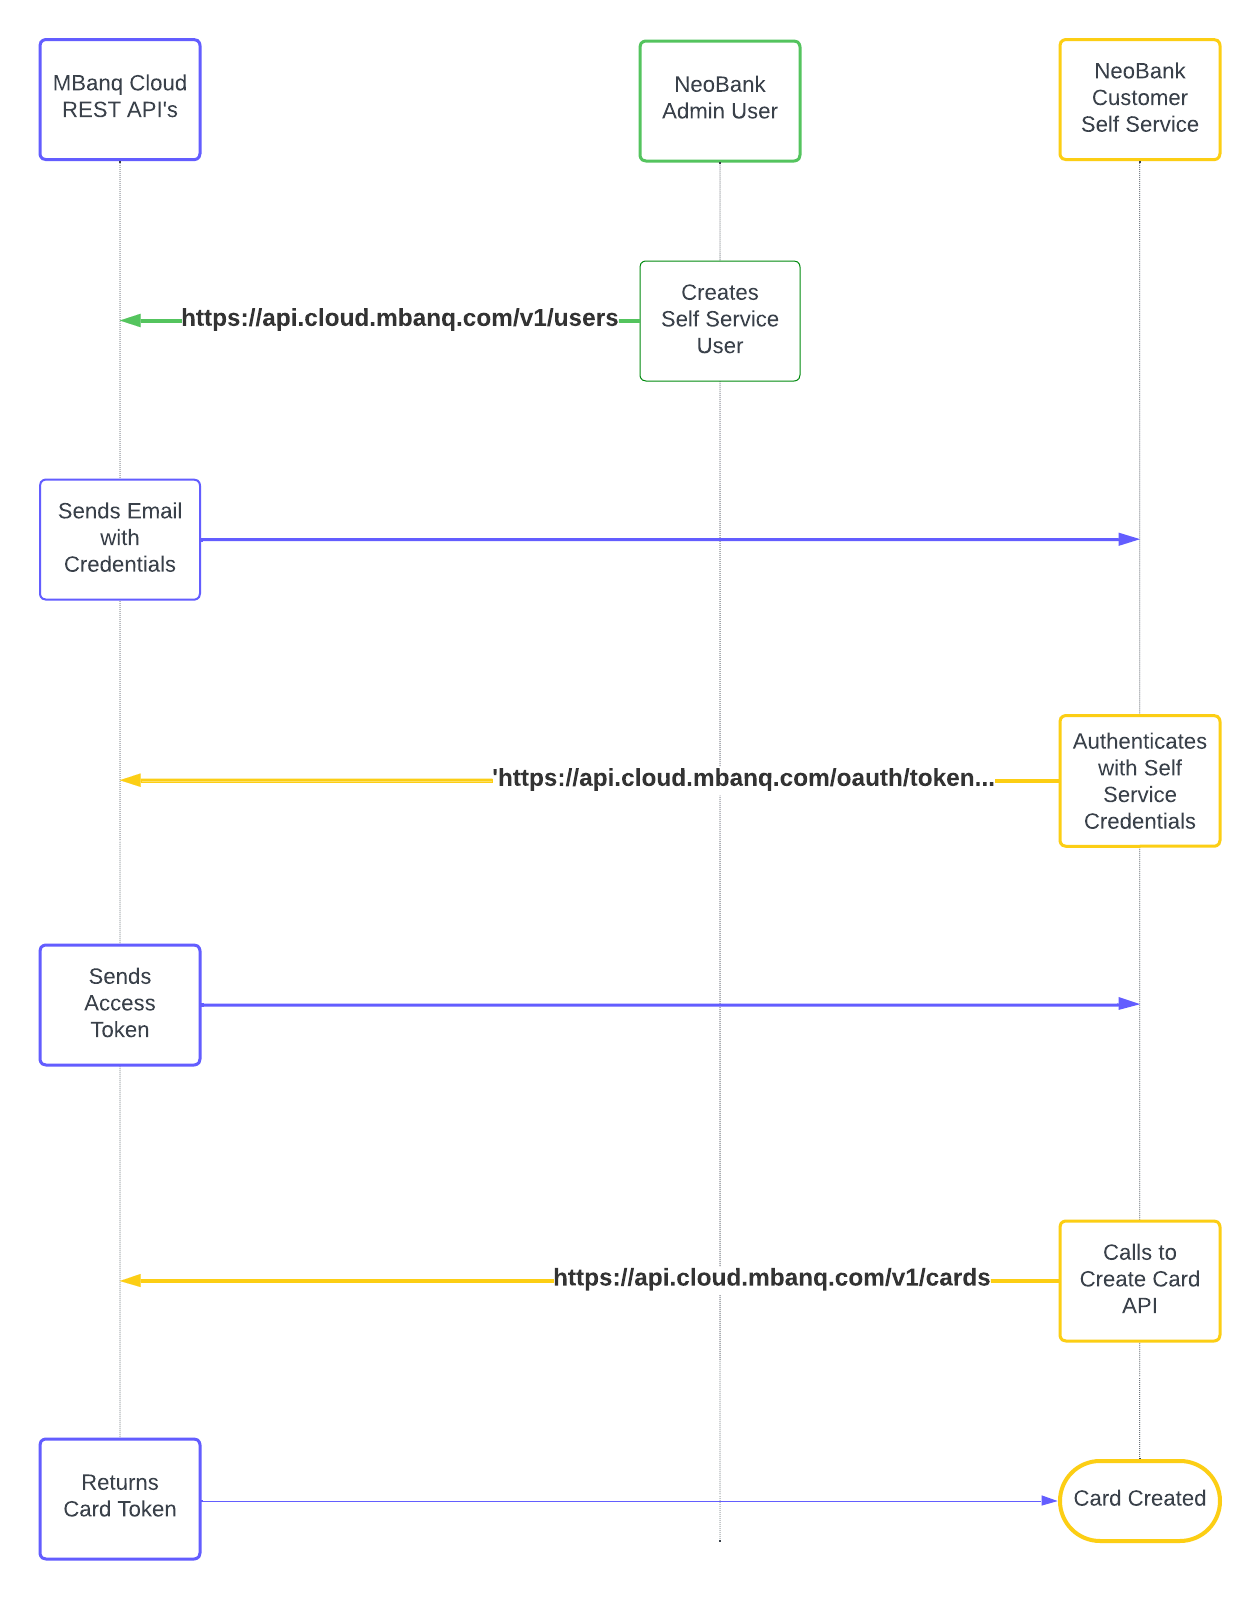
Tutorial: Creating a Self Service User
Let's consider an example scenario involving a commercial business customer that maintains a deposit account with the NeoBank. This customer wishes to create virtual debit cards for their employees, directly from their ERP or Accounts Payable software, without needing to access the NeoBank's user portal. In this case, the NeoBank can create a "Self Service User" profile for this business customer, granting them access to the relevant payments APIs specifically for ACH vendor payments.
Step - 1: Obtain Access Token
To get started, the NeoBank will need to authenticate as an Admin User. This authentication step ensures secure access to the necessary privileges. To authenticate requests, the APIs use OAuth 2.0 access tokens. Please check Access Token - System User
Step - 2: Create the Self Service User
Next, you can create the Self Service User by following the instructions outlined here:
curl --request POST \
     --url https://api.cloud.mbanq.com/v1/users \
     --header 'accept: application/json' \
     --header 'content-type: application/json' \
     --data '{
        "username": "ExampleSelfService",
        "firstname": "Test",
        "lastname": "User",
        "email": "[email protected]",
        "officeId": 1,
        "roles": ["2"],
        "password": "password",
        "repeatPassword": "password",
        "sendPasswordToEmail": false,
        "isSelfServiceUser": true,
        "resetPasswordAfterFirstLogin": false
     }'
During the user creation process, you can tag the user as a self service user and associate the relevant clients they have access to. This association ensures that the user's data scope is restricted to the linked clients, maintaining proper data segregation.
It's important to note that Self Service APIs can only be accessed by self service users, and non-self service users will not have access to them. This segregation ensures the appropriate access levels and enhances security.
Step - 3: Self Service User obtains Access Token
The Self Service User will then need to Log In, by completing the same step above of first receiving an Access Token, using the credentials provided to them by the Admin User.
curl --request POST \
     --url 'https://api.cloud.mbanq.com/oauth/token' \
     --header 'Content-Type: application/json' \
     --header 'accept: application/json' \
     --header 'tenantId: z01h2v187vb8vxj17dbekgm1yd' \
     --data '{
        "grant_type": "password",
        "username": "ExampleSelfService",
        "password": "password",
        "client_id": "12",
        "client_secret": "secret"
     }'
By leveraging the Self Service APIs, you can provide your users with seamless access to specific functionality within the NeoBank's ecosystem, enhancing their experience and enabling them to perform desired tasks directly from your application.
Step - 4: Self Service User can perform User level actions
Upon receiving the token, user will be able to use the access token to perform specific actions restricted to the scope of the user.
Finally, Self Service User creates the Virtual Debit Card
Here we will assume that the NeoBank has already created the "Virtual Card" product previously, and so the Business Customer (Self Service User) will be able to simply select this product type in their request to create a virtual debit card.
In the MBanq self-service user system, both system-users with appropriate permissions and self-service users can create a card using the REST API located in the Misc Folder.
API Reference: Ordering a Card
The Self Service User will be able to issue a virtual debit card:
curl --request POST \
     --url https://api.cloud.mbanq.com/v1/cards \
     --header 'accept: application/json' \
     --header 'content-type: application/json' \
     --data '{
        "cardToken": "566e05a9-431d-462e-8692-67ff011f9dc5",
        "clientId": 12,
        "resourceId": 3,
        "resourceIdentifier": "566e05a9-431d-462e-8692-67ff011f9dc5"
     }'
API Workflow Diagram for this Scenario: